Quantcast
Channel: Magnetism Solutions Dynamics CRM Blog
Viewing all 987 articles
Browse latest View live

Optimizing Dynamics 365 Test Planning and Documentation with XMind Pro Part 2

$
0
0

Another useful thing to know about XMind is the vast number of open source templates available online to the user. I have used a template called ‘XMind 10 Years’ template (http://www.xmind.net/m/G8GP) to setup a timeline-orientated software development plan. For more templates, check out the XMind Open Source Library at http://www.xmind.net/share/

image

Applications for these additional templates can be applied to anywhere in the Dynamics 365 and Dynamics CRM testing and development life cycle. With my example, using a more timeline orientation format of an XMind template can add towards project or test planning with a built-in customized layout, theme and formatting. I have configured my example to show key dates within a software development project in which the template allows me to convey a linear timeline with the available XMind functionality (e.g. markers). This timeline-centric XMind template is grouped with Years and Months listed as Main Topics and Project Dates as Sub-Topics.

image

We can be more specific in using XMind maps with Microsoft Dynamics CRM and Microsoft Dynamics 365. Another template I’ve used allows us to visualise workflows in an XMind document (http://www.xmind.net/m/PUJD). Workflow processes can be depicted to aid a developer and user on how CRM workflows are shown and the logic path of how the workflows are configured within CRM.

image

image

How much value XMind adds to the Dynamics 365 and Dynamics CRM testing and development process for your projects ultimately depends on how it can be utilized best with company processes. Even though XMind Plus and Pro offer a functionality to customize themes, it is good to know the available weapons you have in your arsenal in regards to working out what kind of XMind map layout, theme and formatting is optimal. Determining this comes with playing around with what looks and works best, and experimenting on how this can be carried out with your other test documentations that is used by your project team. I’ll leave that up for you to decide.


Introduction to Power Query with Power BI

$
0
0

This blog is the second in a series of blogs focused on Microsoft’s analytics service, Power BI. In the previous blog I focused on importing data into the Power BI desktop version, while in this blog I will be focusing on Power Query. The data I imported as an example was from the “Rotten Tomatoes Top 100” Web Page and I will continue to use that data in this blog.

clip_image002

Power Query is a Self-Service ETL (Extract, Transform, Load) tool which is used to ‘transform’ the data imported. Importing data is part of the Power Query step but I decided to cover it on its own in the previous blog. The screenshot above shows the Query Editor window which can be split into four areas:

- The ribbon on top contains buttons which can be used to interact with the table.

- The left pane displays the imported tables.

- The centre pane displays the data of the selected table or selected step

- The right pane shows the Query Settings which contain the properties of the table and the applied steps.

I won’t be going into depth for these areas, but will instead give a quick example using the imported movie data.

image

The first thing I noticed with the data was that the Table name wasn’t informative, as the imported table name was “Table 2”. In the screenshot above you can see that by right clicking that table, a set of options are given to edit it. In this example, I will be renaming the table to “Top 100 Movies”.

When interacting with the centre pane we are provided with many different options, allowing us to edit how the data is displayed. Within the table I was given, the 'Ratings' column displayed the values as a percentage in 2 decimal places. As you can see in the screenshot above I could edit this by right clicking the column, going to Change Type and selecting Decimal Number. After this I could rearrange the column order simply by dragging and dropping columns.

The screenshot above now includes the right pane which displays the applied steps. These steps show what transformations will be applied whenever the data is retrieved or refreshed. As you can see it includes the steps we had just done earlier, such as changing the type and reordering the columns.

For the last part of this example I am going to use the Split Column feature which is located in the ribbon under the 'Transform' tab. With the retrieved data, the title column contains both the title of the film and the year it was released which I would like to split into two separate columns. As you can see in the screenshot above I can split a single column into two different columns using a delimiter of my choice. Doing this twice, once for each bracket, allows me to split up the columns and remove the surrounding brackets.

The final screenshot shows the updated table with all the transformation steps applied. Selecting ‘Close & Apply’ in the ribbon will save all these changes and allow us to move onto Power Pivot which will be covered in the next blog.

Introduction to Dynamics 365 Business Rule Recommendations

$
0
0

Microsoft Dynamics 365 includes a new feature called Recommendations. This feature allows the system to recommend certain actions to the user when they interact with the system. These recommendations can be dismissed if the user does not want to perform the suggested action.

Our CRM system contains a custom entity called Sign-Up. When a user enters a phone number which starts with +64, a recommendation should appear next to the Phone Number field. That recommendation needs to ask the user if they want the system to set the Country to “New Zealand”. If the user applies that recommendation, the Country should be set to “New Zealand”, otherwise if user selects Discard, no changes should be made to Country field.

This is achieved by creating a new Business Rules for the Sign-Up entity. A Condition is automatically created and I have configured the properties as shown below.

image

Click on Add and select Add Recommendation. Drag it to the right side of the condition as shown below.

image

Select the Recommendation (highlighted in yellow) to configure its properties. We are applying the recommendation to the Phone field.

image

Select the Action (highlighted in red) to configure its properties. This sets the Country field to “New Zealand”.

image

Then Validate, Save, and Activate Business Rule. Be sure to publish your changes.

Let’s see the Recommendation in action. I have filled out a Phone Number field starting with “+64” which displays a small information icon. Clicking on the icon displays the recommendation and gives the user the option to apply or dismiss it.

image

How to Connect to Dynamics 365 from Microsoft PowerApps

$
0
0

PowerApps let you create custom business mobile apps with little or no code. Using your Dynamics 365 dataset, you can create useful mobile apps for your business, publish and share in no time. You can connect to various cloud applications such as SharePoint, Twitter, Dynamics 365, Google Drive, OneDrive, Office 365 etc. It can also be used with Microsoft Flow and other external data sources.

This blog will help you to connect your Dynamics 365 with Microsoft PowerApps.

1.    Login to the PowerApps website using  http://powerapps.microsoft.com.

2.    Click on the “New app” button at the bottom left of the side bar.

image

3.    Connect to your Dynamics 365 using ‘New connection’ button. Once the connection has been established, all your available datasets would appear to be chosen per the below image.

image

4.    Click on the dataset and then choose the tables you would like to work with. Click onto the ‘Connect’ button down the bottom to proceed further.

image

5.    Hereafter, you’ll be presented with a PowerApps designer with a pre-defined loaded mobile application template. From here, you can start giving meaning to your business logic through PowerApps.

image

The Danger of SQL Operations in Microsoft Dynamics CRM

$
0
0

dangerYou may have heard that performing SQL operations on your Microsoft Dynamics CRM databases are dangerous or unsupported. But what does that mean? What is so dangerous about it? Why is it unsupported?

To clear the air, I’m talking specifically about anything that will alter data in your system and I’m also talking about on-premise deployments since you cannot access the database if you’re in the cloud.

Running SELECT queries on base tables is fine because you’re just consuming data, but the INSERT, UPDATE and DELETE statements are dangerous. I won’t be able to cover every single scenario in this article, but I can provide some examples where seemingly innocent data updates can cause chaos.

Firstly, why are some integrations built to create or update records in CRM using SQL? The short answer is performance. Direct SQL inserts or updates are a lot faster than going through the CRM SDK, but performance is less important than data accuracy and a stable system.

I have seen integrations that create and update Accounts and Contacts using SQL. The integrations only set the core data on these entities, such as names, phone numbers, email addresses, and physical and postal addresses. What are the impacts?

System fields don’t get set

System fields such as Created By, Created On, Modified By, Modified On don’t get set. This is difficult to maintain if you altering data with SQL. It also messes up data analytics (Advanced Find, Reports) if you want to run queries against these fields.

Nothing gets audited

If you’re using Auditing in CRM, no Audit records will get created.

Customer Address records don’t get created

This is an interesting one. Addresses for Accounts and Contacts are stored in a separate table in the database called customeraddress. Creating an Account or Contact using SQL means that the customeraddress record will be missing. If the user manually adds addresses to Accounts or Contacts on the form and clicks “Save”, the address data will disappear because there is no customeraddress record to hold the information.

Email Matching doesn’t work

Another interesting one. CRM contains a table in the database called EmailSearchBase. This table is responsible for matching email addresses for incoming emails to email-enabled entities in CRM. If you have email-enabled records with email addresses in CRM that have been created or updated using SQL, the EmailSearchBase table will be empty and incoming emails won’t be matched to the right records.

Again, there are many other scenarios where SQL inserts and updates are a bad idea. My advice to you is to avoid it. The CRM SDK exists for a reason and ensures that platform business logic is executed to provide accurate data throughout the system.

If you have concerns that your data may have been altered with SQL or you have experienced some of the problems I’ve listed above, leave a comment below.

Step by Step Guide Connecting Microsoft Dynamics 365 with Microsoft Teams

$
0
0

The introduction of Microsoft Teams comes with 70 Connectors that allow Teams to connect with multiple technologies and tools. With the goal of bringing everything together, Microsoft Teams provide users with a centralized platform to pull together technologies, people, and content into one workspace. This includes a connector for CRM with the Dynamics 365 Connector. This blog is a basic guide into setting up the Dynamics 365 Connector in Microsoft Teams.

The functionality of connecting Microsoft Teams with Microsoft Dynamics 365 is similar to Office 365 Groups. Office 365 Groups provide cross-application membership for a set of shared team assets. In this case, these are CRM records in Dynamics 365 so that Team members can collaborate within their respective Channels and Teams. Microsoft Teams is built upon Office 365 Groups.

When the connection is made on a Channel within a Team, Team members get notified for any updates of activities from the specific CRM record selected. To make a Connection between Microsoft Teams and Microsoft Dynamics 365, go to a Channel within a Team. Click the ellipses button (i.e. click … ) and select Connectors.

image

A list of available Connectors in the Team Channel would be shown. Locate the Dynamics 365 Connector (or filter the Category by selecting CRM or typing CRM in the Search bar) and click Add.

image

Choose the Microsoft Dynamics 365 instance to be configured in the Channel Connector. The instance URL will be automatically displayed. Setting up also requires a CRM record to be selected. When Activity records are associated to the selected CRM record in Dynamics 365, Microsoft Teams would post this Activity in Conversations (within the respected Channel in which the Connector is setup in).

image

Once you’ve set this up you can test whether the Connector works between Microsoft Teams and the configured Microsoft Dynamics 365 instance. I’ve established a Dynamics 365 connection in a Channel within a Team with the record “A. Datum Corporation”. The Dynamics 365 Connector would post the following in the Channel Conversation:

image

Then in my Dynamics 365 environment, I tested the connection by making an Activity record for the Account record “A. Datum Corporation”. Highlighted below is the Meeting I’ve created for that Account record in Microsoft Dynamics 365.

image

The Meeting details are posted in Conversations in Microsoft Teams highlighted below. Microsoft Teams handily includes a summary of the monitored CRM record such as fields Annual Revenue and Number of Employees.

image

Something to note is that you can have multiple Dynamics 365 Connectors configured in your Team Channel to modularise different CRM records being followed. Microsoft Teams would notify you of any configured Connectors that need attention which could be useful. For example, when I made a Dynamics 365 Connector for the Lead record “Drake Graham” and Qualified the Lead (which essentially converts it to an Inactive state), the following error is displayed in Conversations in Microsoft Teams:

image

You can view all your Connectors in this regard, and Microsoft Teams handily will indicate which configured Connectors need attention.

image

How to Setup Gamification in Dynamics 365

$
0
0

Gamification in Dynamics 365 lets you transform your day to day operation into competition between employees. For example, you may want to introduce some competition based on the number of Cases your customer service team closes over a certain period. In this article, I will show you how easy it is to add Gamification to your Dynamics 365 system. 

To get started with Gamification in Dynamics 365, go to Settings > Dynamics Marketplace. Search for “Gamification” and select “Microsoft Dynamics 365 – Gamification”. Accept the license agreement and click on Continue.

image

Next, provide the details of the CRM organisation that you want to connect Gamification to.

Wait for Gamification Solution status to be changed to Installed. This may take a few minutes.

image

Once installed, go back into Dynamics 365 and view the installed solutions. There will be two new solutions called “GamificationUpdater” and “Gamification”.

You will have to go through an activation process to complete the Gamification setup. To do that, open up the “Gamification” solution, and then click on Configuration.

image

Click on Start Activation and login to your Dynamics 365 account. Once you have given required permissions, a new window will open. Please note, that window may look blank but it does not imply that something has gone wrong. It is safe to close that window.

It might take a few minutes for Security Key to appear in your Gamification Solution. Once the key appears, copy and paste it in Security Key field. Then click on Activate.

image

A message will appear if Gamification was successfully activated. You will also notice a new Area has been added to the Sitemap dedicated to Gamification related elements.

Microsoft Teams and its Impact with Microsoft Dynamics 365

$
0
0

Microsoft Teams is a chat-based workspace in the Office 365 suite. Microsoft introduced Microsoft Teams on November 2016, and was designed as a competitor to Slack. It is a platform that combines workspace chat, meetings, notes and attachments. By being able to integrate with the company’s Office 365 subscription office productivity suite including Skype, it features extensions for integrating other technologies. Microsoft Team’s promising features raises a lot of questions heading into the future as everyone is moving to the cloud with Microsoft Dynamics 365. In this blog, we will explore some of the main features Microsoft Teams has to offer and how it ties with Microsoft Dynamics 365.

Microsoft Teams has a goal of bringing everything together – people, conversations and content. It promotes easy collaboration such that a working team can achieve more. The chat space named Conversations is grouped into Teams, which can be further modularised into Channels. This is where persistent and threaded chats are used to keep Team members engaged. Team-wide and private discussions are available within these constraints.

image

Conversations is not limited to messaging. Common resources shared within a Team are posted in the Conversations or pinned in Tabs for easy access. This includes shared files, calendars, and other content which encourages collaborative editing. Each Team and Channel can be customized accordingly when adding Tab. Shared and integrated components are publicly available to Team members. This ranges from anything in the Office suite, and other things such as website URLs, PowerBI dashboards, Zendesk and SharePoint.

On launch, Microsoft Teams shipped with over 70 Connectors and 85 Bots which can participate in conversations. For example, within Conversations, you can create polls using the Polly Bot by tagging Polly and adhering to the simple question-answer format. T-Bot is also available in Chat for assistance with anything related with Microsoft Teams. Establishing the Dynamics 365 Connector with Microsoft Teams will be further explained in a later blog post.

Currently, functionality between the Connector is still quite limited. It works similarly like the Office 365 Connector for Groups in which new or existing Office 365 Groups with Dynamics 365 are connected such that the Group is notified when new Activities are posted. This happens similarly with Teams where the connection is made on a Channel within a Team, and Team members get notified for any updates of activities from specific CRM records. In the image below, I established a Dynamics 365 connection in a Channel within a Team. Then in my Dynamics 365 environment, I tested the connection by making an Activity record for the Account record “A. Datum Corporation”. The Meeting details are highlighted below, and Teams handily includes a summary of the monitored CRM record such as Annual Revenue and Number of Employees.

image

Dynamics 365 can still be used in Microsoft Teams as it is IFD by adding it in the Channel Tabs as a website. By simply entering in the Dynamics 365 URL, you can use Dynamics 365 within Microsoft Teams as normal. The user would still need to authenticate themselves by entering their username and password (you’d expect this to be done automatically especially since Microsoft Teams already uses Office 365 accounts).

image

One thing to note though is that using Dynamics 365 within Teams is not intuitive to use and user friendly. For one, when navigating in and out of the Dynamics 365 Channel Tab would reset wherever you were previously in Dynamics 365 and it would take you back to the landing page. Most Dynamics 365 users also have multiple Dynamics 365 records open in multiple browser tabs or windows which Microsoft Teams does not do as it is not a committed browser. Another interesting thing to note is that a user has to enable Microsoft Dynamics 365 within your pop-up blocker. Notably, I initially could not use Advanced Find within Microsoft Teams because of the following pop-up error:

image

It will be interesting to know how further development of Microsoft Teams will affect its integration with Microsoft Dynamics 365. Some things to consider include how Teams and its integration with Outlook items such as Meetings can transfer to Dynamics 365 and its congruent Dynamics 365 Activity records. Adding to these are Skype’s integration with video meetings, and implications of CRM for Outlook. This would of course depend on the demand of users who use Microsoft Teams as their centralized software tool.

Microsoft Teams is a promising tool to tie in multiple integrated technologies including Microsoft Dynamics 365. The use of Dynamics 365 in Microsoft Teams still need refining and tweaking. There is a lot of setting up to do within each Team and Channels, the technologies involved, and most importantly, setting up the actual process of people using the tool to collaborate and share information within a single centralized platform. It’s too early at this stage to know how Microsoft Teams will be accepted by users in conjunction with Microsoft Dynamics 365, but it is exciting to see how it would go about in accomplishing its goal of bringing everything together.


How to Hide the Navigation Items on a Dynamics CRM Form

$
0
0

There is a feature of Dynamics CRM that I have only just learnt about but provides a way to simplify the forms that a user is presented is the ability to hide the form navigation on a record.

As you can see from the images below, the difference in the pages is subtle but the overall effect is significant. Users will not be able to see any of the related records, audit history, activities, connections or processes. Unless of course you place your related records in a subgrid.

imageHere’s how you disable the form navigation.

image

1) Go to the form that you want to disable the navigation on.

2) Open form properties

3) Go to the display tab

4) Deselect “Show Navigation Items”

5) Save and Publish

This simple change can greatly impact your users experience. So use it wisely.

Dynamics 365 Bookmarklet to Test CRM for Tablets

$
0
0

When doing CRM customisations, you might want to quickly check out how your changes have also affected the CRM for Tablets/Phones app (MOCA). To achieve this I have created a bookmarklet that that can open the tablet app in the browser.

To add the bookmarklet, create a new bookmark and set the URL to the following code:

javascript:var url = Xrm.Page.context.getClientUrl();var orgName = Xrm.Page.context.getOrgUniqueName();var baseUrl = window.location.protocol + "//" + window.location.hostname;var phoneUrl = baseUrl + "/nga/main.htm?org=" + orgName + "&server=" + encodeURIComponent(url) + "&phone=false&syncappmeta=true";window.open(phoneUrl);void(0)

Triggering this bookmarklet will then open the normal loading screen that is displayed when first running the tablet app, once it is complete the app will be ready.

image

The bookmarklet will work with both online and on premise versions of CRM, including on premise versions without IFD that the actual app would not be able to connect to.

Note that is it also possible to switch to the phone app instead by changing “phone=false” in the URL to “phone=true”.

3 Easy Steps to Turn on Email Engagement in Dynamics 365

$
0
0

Email Engagement is one of the features in the new Relationship Insights Suite for Dynamics 365. It provides the ability to see email statistics and helps to better track email communication engagement with the customers. It also allows you to monitor things like the opening of an email, tracking if the links have been clicked, instructing on the best email patterns to get a higher response etc. Follow below steps to enable Email Engagement in your Dynamics 365:

Step 1:Login to your Dynamics 365 Sales app and go to Settings –> Administration –> System Settings. Click on the Previews tab, accept the Preview Terms and Conditions on top of the page and check Enable Email Engagement option.

clip_image002

Step 2:Enable Document Management for the Email entity from Settings –> Document Management –> Document Management Settings

clip_image004

Step 3: Accept the Email Engagement Terms and Conditions in Dynamics 365 by navigating to Settings –> Relationship Insights. Then, click on the EmailEngagement tab, and check “Turn on email engagement for your organization” option and finally hit the Save button.

clip_image006

After clicking on the Save button, the setup process will take some time to enable Email Engagement. After the completion of the process, you should be able to see the below Email Engagement section on the right side of the email activity.

clip_image008

How to Use Recommendations in Dynamics 365 Business Rules

$
0
0

A new component has been added for Business Rules in Microsoft Dynamics 365. We now have ability to “Add Recommendation” while setting up business rules. Without the need of code and plug-ins we can now create recommendations for the user based upon business intelligence. It gives user an option to perform recommended activities automatically, and user has the option to “Dismiss” it too. I will use the help of a short scenario to explain better.

Scenario:

There is a form in Registration Entity, where user can enter the details in the fields. We will be creating a new business rule such that, when user enters a phone number, and if the condition is met, the recommendation is shown to the user to auto-fill the Country and City fields. If the recommendation is prompted, then user will have option to “Apply” or “Dismiss” the recommendation.

Process:

1) Create a new business rule for relevant entity and form.

2)  “Condition” component is already created by default, and one way to add and link the “Recommendation” component to the condition is to drag a new “Recommendation” and drop it on either one of the “+” icons on the relevant condition, as shown in the image below. clip_image002

3.1) Enter the properties of recommendation component, as shown in the image below.

3.2) Click on “Apply”.

3.3)  Click on “Details” and expand it to view “Actions”clip_image004


4) Click on “New Action” to view the properties for this action. The properties for this action will set the value of Country field to New Zealand. Refer to the image below. Then click on “Apply”clip_image006

5) To add another Activity to recommendation, click on it, then click on components (on left of properties), then expand the details (under recommendation), drag and drop the “Set Field Value” action to the recommendation. Refer the images below for better understanding.

clip_image012


image

6) Almost same tasks will be performed for this new field action too. But this time it is for “City” field, as shown in the image below. After all the information is entered, click on apply.

clip_image014

7.1) Click on “Condition” and enter the details in properties to trigger the “Recommendation” component. In this case, if user enters phone number starting with +649 in Phone number field the recommendation component will trigger. In our case, +64 implies that phone number is from New Zealand and 9 implies that phone number is from Auckland region. After all the details are entered, click on apply.

7.2) Since all the components have been set, click on “Validate” to check whether if every task performed is valid or not, then save this business rule. However, to activate these changes, we have to click on “Activate” too, as shown in the image below.clip_image016


Recommendation Component in Action

If we go back the form now, and when I enter the phone number field which starts with +649,
icon appears next the field. If I click on the icon, this is what I will see.

clip_image020
As a user, I have 2 options, either to Apply recommended changes or Dismiss them. If I click on apply, Country and City fields will automatically fill in, as shown in the image below. clip_image022

However, if I dismissed that recommendation, the fields would have stayed empty just like “Age” field is empty in image above. But, even if I Apply the recommendations, that doesn’t mean I am not able to change the data in the auto-filled fields. I can still change the values in those fields, like shown in image below, where I changed City from Auckland to Wellington. clip_image024

Room for Improvement

Even though “Recommendations” is a very helpful component, it still comes with flaws and there is some room for improvement.

1) Adding a new action requires user to perform more steps than necessary. This could easily be fixed by adding an “Add” icon like shown on right, which is not available in current version as shown in image on left.

clip_image026

2) Once the properties of “Recommendation” are set, the details showing “Actions” should automatically be expanded, but it doesn’t. Again, it requires the user to perform extra steps.

3) The “i” icon is always displayed after finishing its job. No matter what the user does, whether if he/she “Applies” or “Rejects” or opens it and ignores it. This makes this functionality less user friendly, the icon stays next to the field, and user has no way to figure out whether if he/she has looked at it before or not (unless the user remembers it).

4) If user is entering the values of a component’s properties, and by mistake clicks on a different component without clicking on “Apply”, all the data entered is lost in the properties of first component that user previously was on. So, when user goes back to the properties of first component, he/she has to fill-in the values in the properties field again.

How to Add a Sub Grid Search Box to a Dynamics CRM 2016 Quick View Form

$
0
0

Using a Quick View Form on a record in Dynamics CRM is a good way to view information about a related record. Fields can be added to the Quick View Form and sub grid to associated records. There are times when a sub grid contains many records and to search the records you can enable the Search functionality by selecting the “Display Search Box” option when setting up the properties.

clip_image002

But once you view this sub grid on the form with the “Display Search Box” option enabled, the Search Box is mostly hidden. Entering text into the Search Box is possible but the text is not visible.

clip_image004

Use the following unsupported JavaScript to add styling to the main div html tag to fix the issue and force the Search Box to be fully visible.

clip_image006

clip_image008

Note that Dynamics 365 does not have this issue, so be sure to remove this unsupported JavaScript if you decide to upgrade in the future.

Useful Dynamics CRM 2016 Web API Queries - Part 1

$
0
0

Web API is a new platform feature of Dynamics CRM 2016 that exposes CRM data over OData (Open Data Protocol). Web API offers REST based endpoint which can be used across a wide variety of programming languages, platforms, and devices.

Since Web API is intended to replace existing SOAP base endpoint I started using the Web API feature in JavaScript web resources to query for data.

Here are some queries which I found useful:

Use the plural name of the entity when querying for data

image

When using the Entity Name as it is the result will be an error “Resource not found for the segment”.

GET    http://testserver/testorg/api/data/v8.0/mag_consumersetup?$select=mag_name&$filter=contains(mag_name,'Test')
     {
   "error":{
     "code":"","message":"Resource not found for the segment 'mag_consumersetup'.","innererror":{
       "message":"Resource not found for the segment 'mag_consumersetup'.","type":"Microsoft.OData.Core.UriParser.ODataUnrecognizedPathException","stacktrace":"   at
…………
}

Using the plural name of the Entity by added ‘s’ to form mag_consumersetups resolves the issue.

GET    http://testserver/testorg/api/data/v8.0/mag_consumersetups?$select=mag_name&$filter=contains(mag_name,'Test')
     {
   "@odata.context":"
http://testserver/testorg/api/data/v8.0/$metadata#mag_consumersetups(mag_name)","value":[
     {
       "@odata.etag":"W/\"1257828567\"","mag_name":"Test A","mag_consumersetupid":"e0b6ae92-4230-e711-80bf-00155d048d78"
     }
   ]
}

Querying a custom entity with Business Process Flow enabled

image

When querying for all field values of Entity records the error “Property 'stageid' is of an unrecognized EdmPropertyKind”.

GET    http://testserver/testorg/api/data/v8.0/mag_consumersetup?filter=contains(mag_name,'Test')
     {
   "error":{
     "code":"","message":"Property 'stageid' is of an unrecognized EdmPropertyKind. Entity mag_onboardingrequest has duplicate navigation property names. All property names (Navigation and Structural property) must be unique in an Entity ","innererror":{
       "message":"Property 'stageid' is of an unrecognized EdmPropertyKind. Entity mag_onboardingrequest has duplicate navigation property names. All property names (Navigation and Structural property) must be unique in an Entity ","type":"Microsoft.Crm.CrmHttpException","stacktrace":"   at Microsoft.Crm.Extensibility.OData.CrmODataEntityTypeSerializer.CreateSelectExpandNode(EntityInstanceContext entityInstanceContext)\r\n   at …………
}

Query only the fields you need by specifying a select statement and field names

GET    http://testserver/testorg/api/data/v8.0/mag_consumersetups?$select=mag_name&$filter=contains(mag_name,'Test')
     {
   "@odata.context":"
http://testserver/testorg/api/data/v8.0/$metadata#mag_consumersetups(mag_name)","value":[
     {
       "@odata.etag":"W/\"1257828567\"","mag_name":"Test A","mag_consumersetupid":"e0b6ae92-4230-e711-80bf-00155d048d78"
     }
   ]
}

Querying an Action that has multiple output parameter with a least one of type EntityReference

image

POST    http://testserver/testorg/api/data/v8.0/mag_TestMultipleOutput
     {
   "error":{
     "code":"","message":"Resource not found for the segment 'mag_TestMultipleOutput'.","innererror":{
       "message":"Resource not found for the segment 'new_TestMultipleOutput'.","type":"Microsoft.OData.Core.UriParser.ODataUnrecognizedPathException","stacktrace":"   at
…..
}

Workaround is to change the ContactOutput type from EntityReference to String and return a json string representing the contact record.

image

POST    http://testserver/testorg/api/data/v8.0/mag_TestMultipleOutput
     {
   "@odata.context":"
http://testserver/testorg/api/data/v8.0/$metadata#Microsoft.Dynamics.CRM.mag_TestMultipleOutputResponse","StringOutput":"test","ContactOutput":"{ \"contactid\" : \"FA2A2CA9-B0FC-E211-A2E0-00155D0C8359\" }"
}

Use JSON.Parse to convert response from a Json string into a response object then JSON.Parse the ContactOutput string to obtain the contacted.

image

Video Overview of Dynamics 365 Email Engagement

$
0
0

As part of the suite of features in the new Relationship Insights module in Dynamics 365, Email Engagement allows users to get further insight into how their customers are engaging with outbound emails from Dynamics 365.

In this demo, we give a short overview of Email Engagement and how you can use it to better manage your email communications with your customers.


Dynamics 365 Form Editor Button Opens a Different Form

$
0
0

Recently one of our clients had a situation where the Form Editor button would only open the main form. The client had just updated to Dynamics 365 and had stated that this issue had never happened with their previous version of CRM. While investigating this issue, I found that this was OOTB behavior with Dynamics 365. For comparison, the form editor button on all the previous versions of CRM would open the form the user was currently on, instead of always opening the main form. The screenshot below shows the unintended form opening when the form editor button is pressed in Dynamics 365.

clip_image002

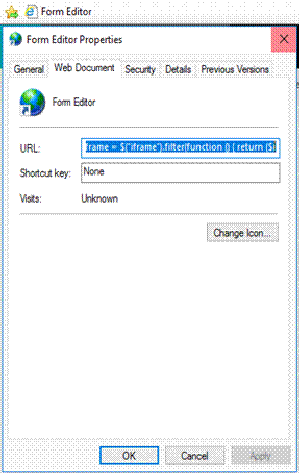
Our solution for this is to create a form editor button to imitate the previous button functionality. Internally we use a bookmarklet button which can be added to your browser for easy access on any record. The code for the new form editor button is shown below:

javascript: var frame = $("iframe").filter(function () { return ($(this).css('visibility') == 'visible') }); var form = frame[0].contentWindow;var etc = null;try {etc = form.Xrm.Page.context.getQueryStringParameters().etc;} catch (e) { }if (etc == null || etc == 4200) {var entity = prompt("Type the entity name", "account");if (entity != null) {etc = form.Xrm.Internal.getEntityCode(entity);if (etc == null || etc == -1) {alert("Entity '" + entity + "' does not exist");}}}if (etc != null && etc != -1 && etc != 4200) {var formId = null;try {formId = form.Xrm.Page.ui.formSelector.getCurrentItem().getId();} catch (e) { }form.Mscrm.FormEditor.OpenFormEditor(etc, "main", formId);}void(0);

The following steps can be used to add the form editor bookmarklet to Internet Explorer. Other browsers should be able to use this bookmarklet button following the same steps:

Step 1: Open Internet Explorer, click the “Add to favourites bar” button in the space underneath the URL, for other browsers you may need to do something like right clicking this space and selecting “Add Page” from the dropdown menu.

Step 2: Enter a name for the bookmarklet (E.g. Form Editor) and copy the URL above into the ‘URL’ textbox.

image

Step 3: Now that the Form Editor Bookmarklet button has been created, navigate to the entity and form you wish to edit and click the Form Editor Bookmarklet.

Step 4: The correct form editor should open the intended form as shown in the screenshot below.

Gotchas with Dynamics 365 Record Creation and Update Rules

$
0
0

Working with Dynamics 365 Record Create and Update Rules (RCUR) can be a useful user friendly way of creating workflows based on items that are added to a Queue. Here are some things I found helpful when developing a set of RCURs for a project.

1.    If you rename a RCUR step, the background workflow that was created is not renamed as well. This does not pose a problem to the users however it can be problematic if you are trying to debug a problem by searching the system jobs, as the name of the RCUR step and the name of the system job will not be the same.

2.    Re-ordering RCUR steps does not come across in a solution deployment. You must do it manually before activating the rule. So, plan the order you want things to be done in before you start creating steps. See below where steps 1.5 and 3.5 were moved to happen before 1.0 and 3.0. After importing the solution into a test environment, the steps have been ordered into their original sequence.

image

3.    When adding a RCUR to a Dynamics CRM solution you need to add required components. This adds the background workflows to the solution which you cannot otherwise see.

4.    When you create records in the Actions section of the rules (as opposed to the Specify Other Actions) they will try to default some of the fields to null(Channel Properties). For example, cases will default Customer, Origin and Contact to null(Channel Properties). If you change this, it cannot be manually reset and you must recreate your step.

5.    If your rules are failing when receiving messages from unknown senders, try unticking the Create records from unknown sender’s option on the RCUR. Instead, enable create contacts from unknown senders on the Email Router user (through Personal Options) or if you are using Server Side Sync the SYSTEM user can create contacts.

image

Keep these in mind when developing your Dynamics 365 Record Create and Update Rules and you will find building them and troubleshooting goes much smoother.

Be Careful when Configuring Security Roles for Business Process Flows in Dynamics 365

$
0
0

Microsoft Dynamics 365 introduces a fancy new editor for Business Process Flows. Although it looks slick and provides a visual representation of your processes, there is a fundamental problem with the new designer with regards to Security Roles. To illustrate the issue, I will be comparing the designer in CRM 2016 with the designer in Dynamics 365.

Firstly, let’s look at what happens when a user tries to enable security roles for a Business Process Flow in CRM 2016. A light-box appears where the user can enable the flow for everyone, or select specific roles.

clip_image002

In comparison, Dynamics 365 does something very different. Instead of opening a lightbox, it opens the same screen that a user would see if they tried to create or modify existing security roles in the Security area of the system. In fact, it opens in a separate window and there is no OK button to apply the roles to the flow.

clip_image004

This issue is made worse if you have upgraded a Business Process Flow which is enabled for certain Security Roles from CRM 2016 to Dynamics 365. Let’s say you wanted to remove an existing role from the Business Process Flow. Again, there are no buttons available to link or unlink the role from the process flow, so users might think to use the Delete button instead. If you do this, it will delete the Security Role from the system entirely!

clip_image006

Be very careful when configuring Security Roles with Business Process Flows in Dynamics 365!

What to do when reminders are missing for appointments synchronized from Dynamics 365

$
0
0

Appointment in Outlook will be allocated a reminder time based on the user’s Outlook personal options:

clip_image002

This means that they then pop up in the user’s Outlook as a reminder, the specified time before the appointment starts:

clip_image004

This is really useful. The user doesn’t miss the appointment, and is able to use the reminder period to prep for the meeting.

When you synchronise appointments made in Dynamics 365 into Outlook, whether you use the Dynamics 365 for Outlook or Server Side Synch, typically you’d want the same reminder period as you have for any appointment created in Outlook.

Recently, I had a problem where a client was reporting that although any appointments created in Outlook had their default reminder time set automatically, any synchronised from Dynamics 365 had no reminder time set:

clip_image005

I tried testing this by creating appointments in Dynamics 365 manually, and letting the synchronisation run. I found that the reminder was set based on my Outlook personal options, so I was none the wiser in fixing their issue.

I then realised that the appointments this client was having a problem with were being created by workflow in CRM. So, I created a workflow to create appointments in my test CRM.

What I quickly realised was that when you create an appointment manually in CRM, the initial status is ‘Open’.

clip_image007

However, as soon as you save the appointment in CRM, the status automatically changes to ‘Scheduled’.

clip_image009

This behaviour is different when you create an appointment using a workflow. It creates the appointment as ‘Open’, with a ‘Status Reason’ of ‘Free’:

clip_image011

The workflow designer had only 1 step, to create the appointment:

clip_image013

When you click ‘View properties’, you see the appointment form and the fields set by the workflow:

clip_image015

As you can see, you don’t get to set the status on this screen.

So, what you need to do is create another step on the workflow to change the status of the appointment. I’ve set it below to Status of ‘Scheduled’ and Status Reason of ‘Busy’.

clip_image016

This fixed the issue, and when the appointment created by the workflow came in to Outlook, it was created with the default Outlook reminder time:

clip_image018

So, the point of all this is - if you create appointments in CRM via workflow, make sure you include a step in your workflow to set the Status as ‘Scheduled’ and the Status Reason as whatever is appropriate for your scenario, and the Outlook reminder time will work as expected.

Happy CRMing everyone!

What To Do With a Dynamics 365 Lookup OnChange Event Error

$
0
0

I recently came across an odd JavaScript error for the onChange event of a lookup field in Dynamics 365. Apparently, removing the lookup item from the field works fine if it’s being removed directly from the form, however, when removing it from the ‘Look Up Record’ dialog box (see below), a JavaScript error “Unable to get property ‘id’ of undefined or null reference” pops up.

clip_image002

The same JavaScript onChange event is being called from the ‘Look Up Record’ dialog box and from the form. For the latter scenario, getValue method returns ‘null’ on removing the item from the lookup field but the same method returns an empty array when removing it from the ‘Look Up Record’ box. Hence, the JavaScript error pops up.

Therefore, if you encounter this error on a LookUp onChange event, make sure you’re checking the ‘null’ value for the first array element in your code as below:

clip_image003

Viewing all 987 articles
Browse latest View live


<script src="https://jsc.adskeeper.com/r/s/rssing.com.1596347.js" async> </script>